I have been asked to post a tutorial on Body Painting with Photoshop. I will be doing it in Photoshop CS 4 Extended, but you can do it in any version of PS. This will also teach you to use the Pen Tool. Do not avoid the Pen Tool. It is an excellent Tool and a photoshopper should know how to use it. So if you are interested in showing off yourself in body paint, all you need is a picture of yourself and then follow this tutorial.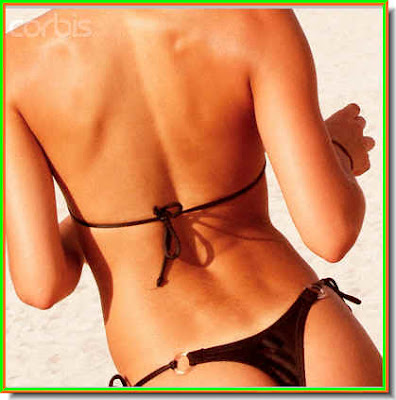
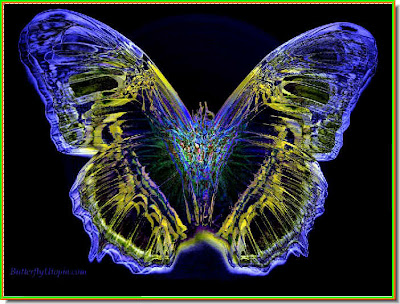
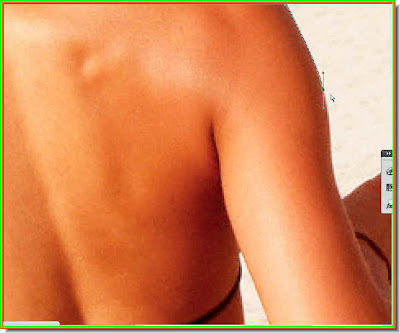
Step 1 : I have opened these two photos -- one of the back of a woman and the other of a butterfly. You can choose your own images, particularly the image that will be used for body painting. I will use the photo of the butterfly for the body painting. 
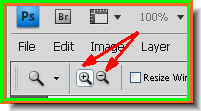 Step 2 : Click on the Zoom Tool. Look in the top panel where you will see two magnifying glass like images. The one marked with a plus is for zooming in and the one with the minus for zooming out
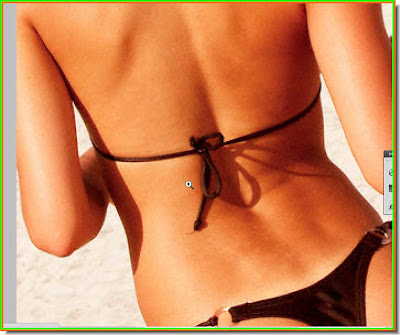 Step 3 : Zoom into the image. We need to see what we are doing.
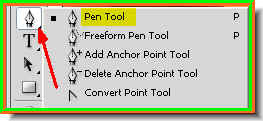 Step 4 : Click on the Pen Tool. If you do not know how to use the Pen Tool, it is about time you got used to it. It is easy once you know how. I will show you hands on.
Step 5 : When you zoom in you will not be able to see the whole image. How do you find which part to navigate to? Simply look at the Navigator window at the top right of Photoshop. You can see your image. The red outline shows the part that is visible. Place your cursor on the Navigator window and drag. You will find a small white hand appear. You can navigate to any part of the image while working. With the Pen Tool this is an advantage as you can work in great detail, which results in the finished image being very good. 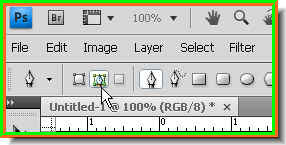
Before you begin to work with the Pen Tool click on the Paths icon in the top panel as shown by the arrow or the selection will turn black as you progress with the Path.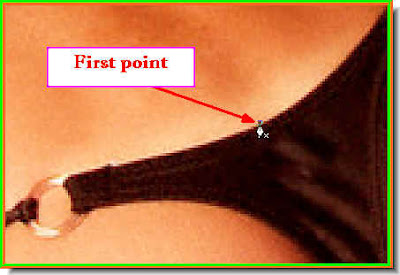
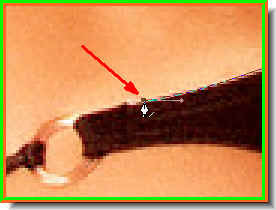
Step 6 : Click anywhere in the image with the Pen Tool. A small dot appears.
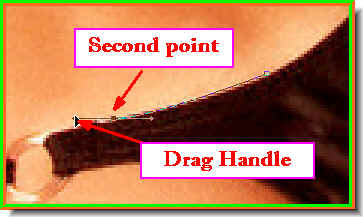 Step 7 : Click a second point. I have clicked the second point to the left and without letting go of the left mouse button drag. You will find two handles appear. Manouvre the left handle until the line connecting the first and second points align with the curve.
 Step 8 : Now Press ALT and you the left handle is deleted.
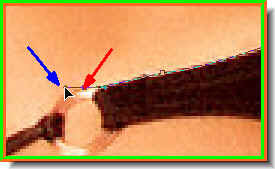 Step 9 : Now click another point and again without letting go of the left mouse button drag and the two handles will appear again.
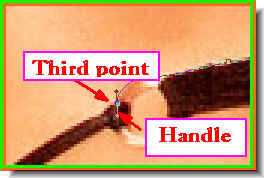 Step 10 : Click a third point and without letting go off the left handle drag until the line connecting point 2 and 3 aligns with the curve. This is the secret of the Pen Tool. This is how you use it.
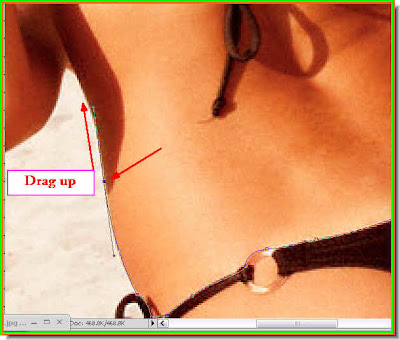 Step 11 : I have clicked and dragged. For gentle curves you can increase the distance of the points and drag the left handle to align the connecting line with the curve. Then press Alt and the left handle is deleted. This is all and you can use the Pen Tool like an expert. It takes just a little bit of practice. The Pen Tool is accurate to within half a pixel so selections with it are the best. You cannot achieve the same accuracy with the Lasso Tools. In the first place if you use the Lasso Tools, you cannot work on an enlarged image. Therefore your selection will not be flawless, which it is with the Pen Tool.
 Step 12 : I have worked around the body. Note I am only selecting the skin portions.
Step 7 : Click a second point. I have clicked the second point to the left and without letting go of the left mouse button drag. You will find two handles appear. Manouvre the left handle until the line connecting the first and second points align with the curve. Step 8 : Now Press ALT and you the left handle is deleted. Step 9 : Now click another point and again without letting go of the left mouse button drag and the two handles will appear again. Step 10 : Click a third point and without letting go off the left handle drag until the line connecting point 2 and 3 aligns with the curve. This is the secret of the Pen Tool. This is how you use it. Step 11 : I have clicked and dragged. For gentle curves you can increase the distance of the points and drag the left handle to align the connecting line with the curve. Then press Alt and the left handle is deleted. This is all and you can use the Pen Tool like an expert. It takes just a little bit of practice. The Pen Tool is accurate to within half a pixel so selections with it are the best. You cannot achieve the same accuracy with the Lasso Tools. In the first place if you use the Lasso Tools, you cannot work on an enlarged image. Therefore your selection will not be flawless, which it is with the Pen Tool. Step 12 : I have worked around the body. Note I am only selecting the skin portions.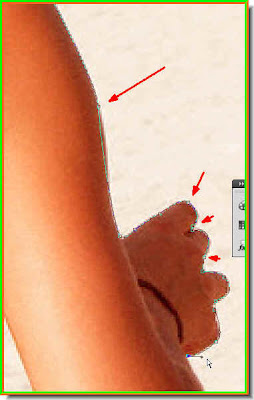
Step 13 : For gentle curves, click the points some distance apart, for short curves such as fingers I have clicked points that are closer between two points. The more you use the Pen Tool the more amazed you will be how flawlessly it works.
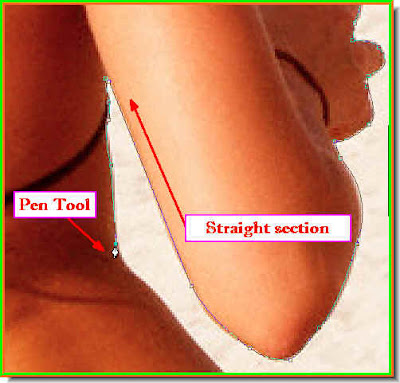 Step 14 : For straight sections you can place the dots at longer distances.
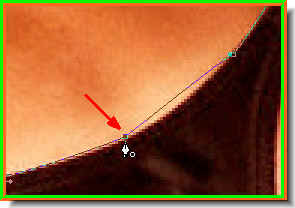 Step 15 : When you come back to the first point and hover the Pen Tool a small circle will form near it. You can see it above. Drag the handles to make the last alignment.
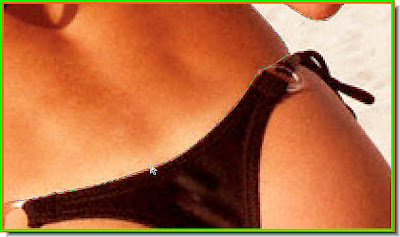 Step 16 : The path has closed. The dots that you clicked created a path, which closes when you come back to the first point.
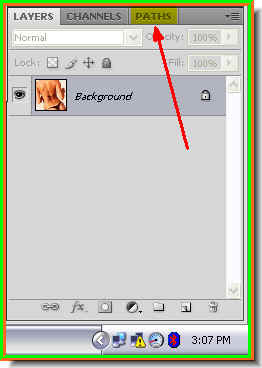 Step 17 : Now look at the Layers/Channels/Paths pallete at bottom right of Photoshop and click on Paths.
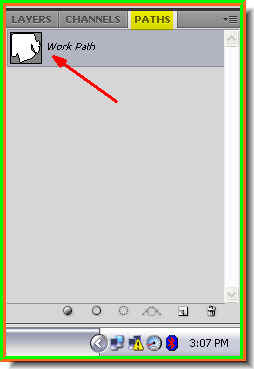 Step 18 : When the Paths pallete opens you wil find a Workpath. See above.
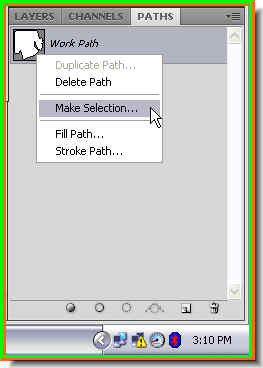 Step 19 : Right click the Work Path thumbnail and a popup appears. Click on 'Make Selection'.
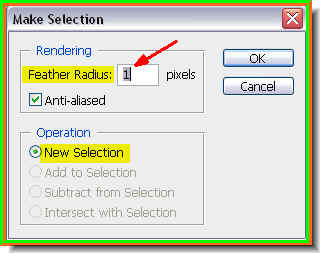 Step 20 : As soon as you click on 'Make Selection' this dialogue box appears. Set the Feather Radius at 1 pixel. By default the New Selection will be checked. Click ok.
Step 21 : The Work Path changes into a selection of 'marching ants'. Note that the entire skin area has not been selected. It has to be selected also with the Pen Tool. Also the selection includes the bikini strap. It has to be excluded from the selection.
 Step 22 : Again zoom onto the image and click on the Pen Tool to select it. Begin clicking and dragging again to make a new path.
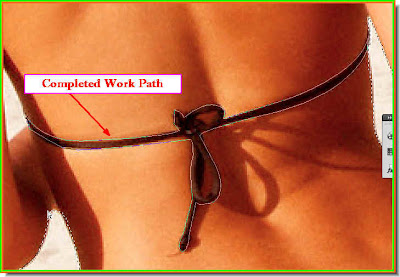 Step 23 : I have made a new Path with the Pen Tool by click and dragging as shown earlier.
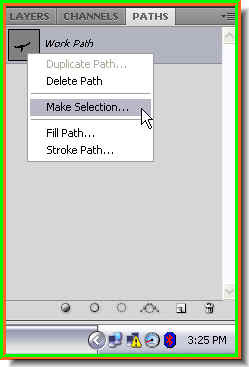 Step 24 : Right click the Work Path and from the pop up click on 'Make Selection'.
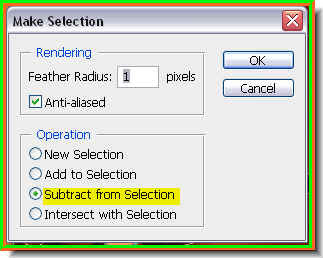 Step 25 : In the Make Selection dialogue box click on 'Substract from Selection'. Since a selection of the area already exists, the new selection has to substract from it to omit the bikini straps. Click ok.
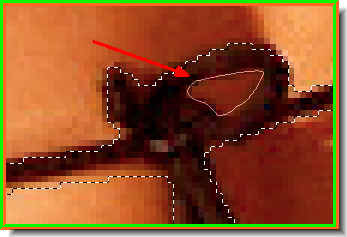
Step 26 : The new selection.
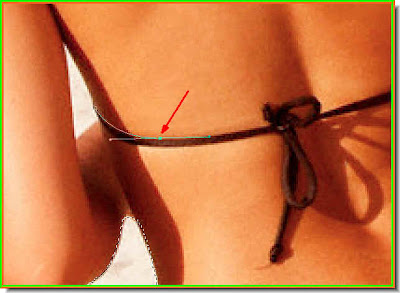
 Step 27 : I have now zoomed in on the tiny bit of skin between the knot in the bikini straps and made a new path with thePen Tool.
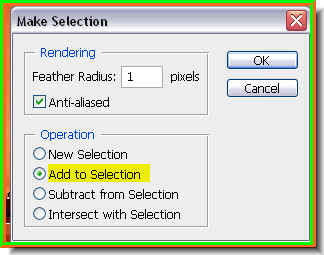 Step 28 : After right clicking the Work Path, I have now selected 'Add to Selection'. Click ok.
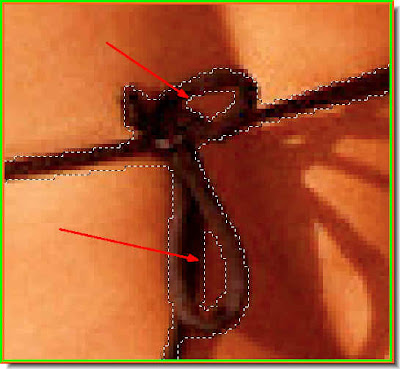 Step 29 : The skin between the bikini strap knot has also been selected. This is the advantage of the Pen Tool. You can zoom in and work to make selections impossible with the Lasso Tools.
 Step 30 : The entire skin area that I wanted to select has been selected. With the selection in place, I am keeping aside this image and will work on the butterfly image.

Step 31 : Now select the butterfly with the Pen Tool.
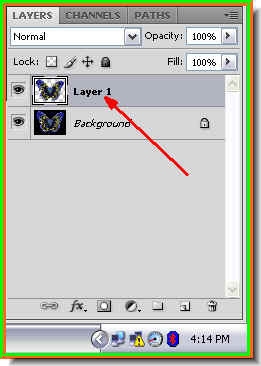 Step 32 : With the selection in place, Press CTRL+J on the keyboard. This will copy and paste the selection on a new layer -- Layer 1.
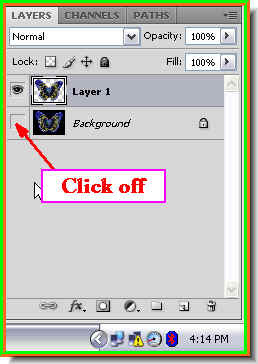 Step 33 : Now click off the eye icon on the Background layer.
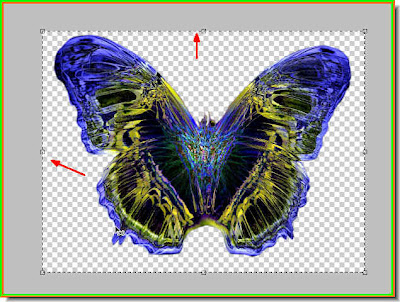 Step 34 : This is how your image looks. Press CTRL+A (select all), then CTRL+C (copy) and minimise the image. It will not be needed any more.
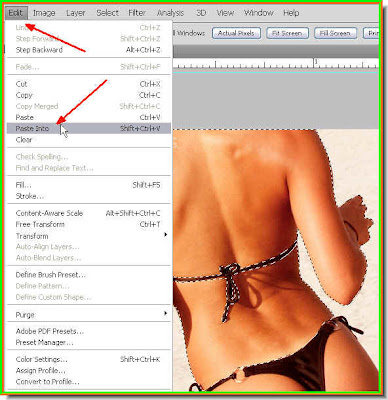 Step 35 : Now click back on the original photo, here I am click back on the photo of the woman. Go to Edit>Paste Into. Ordinarily the Paste Into command is greyed out. But you can use this command here.
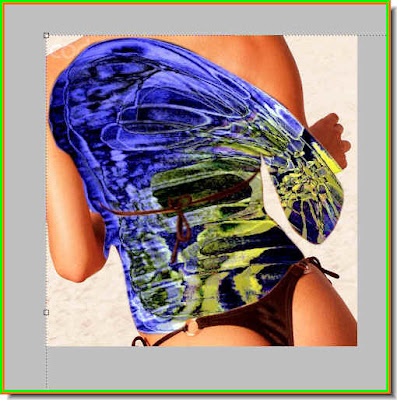 Step 36 : There, the butterfly has been pasted into the selection I had earlier made with the Pen Tool. I know, I know it does not look right. Let me fix it.
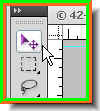
 Step 37 : Click on the Move Tool and in the top panel make sure that 'Show Transform Controls' (Bounding Box in PS7) is checked.
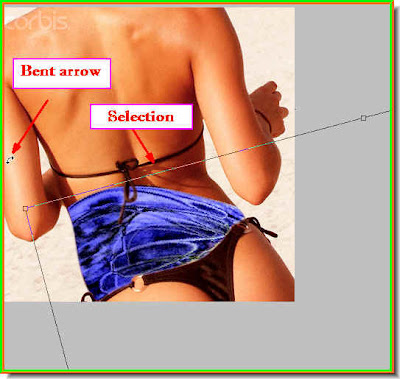 Step 38 : Drag with the Move Tool till a corner of the selection is visible. Hover your cursor on a corner and a small, bent two headed arrow appears. You can rotate the selection with it as shown.
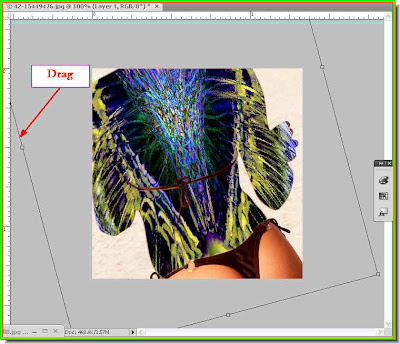 Step 39 : Drag and reposition the image. Drag out the selection corners, till the butterfly wings are positioned to your satisfaction. Then press enter on the keyboard to apply the transformation.
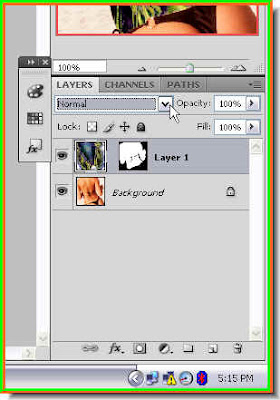 Step 40 : Click where the arrow points to, to change the Blend Mode.
 Step 41 : From the popup choose Overlay or Soft Light.
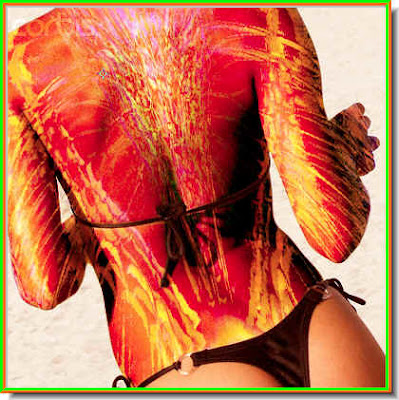 Step 42 : This is how the image looks.
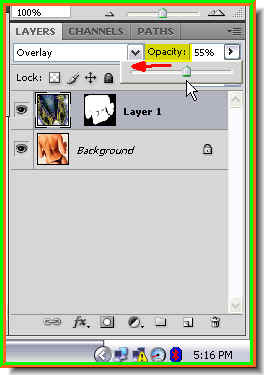
Step 43 : Now reduce the Opacity. I have reduced it to 55%. It will depend on your image.

This is how my finished image looks like. Show me yours.
Tidak ada komentar:
Posting Komentar